This is the third post in the “Customize RD Web Access 2012 R2” series.
In case you missed the first two posts:
Step by Step Customizing RD Web Access 2012 R2 – Part 1, in which the login page and several customizations is handled.
Step by Step Customizing RD Web Access 2012 R2 – Part 2, in which the default page and several customizations of it is handled.
This post will focus on the page that is shown when you click the “Connect to a remote PC” tab.
For this post I also reverted back to a fully default RD Web Access installation, so we start fresh.
Just as a friendly reminder, we’ll be editing the files in the Web Access interface, which can be found in %windir%\web\rdweb\pages\<language-code> on the RD Web Access server.
To be safe, make a full backup copy of the %windir%\web\rdweb\pages folder and subfolders before editing anything.
By default, the Connect to a remote PC page looks like this:

The file responsible for showing you this page is called Desktops.aspx. Note that I clicked the Options button, as you can see in the screenshot. I will show modifications to the different sections in this page, starting with “Connection options”, then “Devices and resources”, and ending with “Additional options”.
Customizing the Connection options – “Connect to:” section
The “Connect to:” textbox is where you normally type the computername for the machine you want to connect to.
We have several options to customize that.
- Replacing the textbox with a pre-populated drop-down
I’m not going into too much detail on how this works. It basically works the same as in Windows 2012 RD Web Access, and Freek Berson has a pretty good detailed write up of that in one of his blog posts: Customize RD Web Access, a drop down server list.
I will, however, repeat the steps here. I take no credit for the drop-down idea or methods, Freek Berson is the one to thank for that.
Open “Desktops.aspx” and go to line number 848.
For reference, line 848:
![]()
Copy the following code and insert it before line 848:
function GetDestination(sParam, bReqd, vDefault)
{
       var obj = document.getElementById(sParam);
       if(obj != null)
       {
             switch(obj.tagName)
             {
                    case "SELECT":
                           return obj.options[obj.selectedIndex].value;
                           break;
                    default:
                           break;
             }
       } else {
             if ((bReqd) && ((vDefault == "") || (vDefault == null) || (obj == null)))
{

var L_ErrMsgInvalid_Text = "%ParameterName% is not a valid or available parameter name.";  // {Placeholder="%ParameterName%"}

var errMsgInvalid = sParam;

errMsgInvalid = errMsgInvalid.replace("%ParameterName%", sParam);

var retval = TSMsgBox(errMsgInvalid, vbInformation, L_sTitle_Text);

return null;

} else {
                    return vDefault;
             }
       }
}
Be careful not to change anything, just paste the code in front of the function that starts on line 848.
On line 271 you’ll find the following code:

You can also find it quickly by searching for
<input name="MachineName"
And then moving one line up.
Replace that highlighted piece of code with the following piece of code:
<td valign="top" style="padding-bottom:4px;" colspan="2">
 <select id="MachineName" style="width: 270px" name="MachineName">

<option value="rds01.lab.local" selected="selected">rds01.lab.local</option>

<option value="rds02.lab.local">rds02.lab.local</option>

<option value="rds03.lab.local">rds03.lab.local</option>

</select>

</td>
You can change the “rds01.lab.local” and other machine names with your own machine names.
Notice this is slightly different from Freek’s code, because on 2012R2 we need to remove some padding and add a class definition to the <select> statement, or the result looks horrible.
The resulting code on lines 270-278 will look like this:

Now find
<button type="button" id="ButtonConnect" name="ButtonConnect" disabled="disabled" class="formButton"
on line 307:
![]()
Note that this is only part of the code on that line.
Remove the selected code (the dark grey bit), so it looks like this:
![]()
So simply put, remove the ‘disabled=”disabled”’ part, which effectively enables the “Connect” button.
To finish this off go to line 748:
![]()
Replace “GetParam” with “GetDestination”, like this:
![]()
If you refresh the RD Web Access page you can test run your changes:

If you don’t want to make these modifications yourself you can download the modified Desktops.aspx here. This file has all the modifications mentioned above, to create the pre-populated drop-down menu. You do need to rename it to “Desktops.aspx” though.
- Replacing the textbox with a table of clickable links
Instead of making a drop-down wouldn’t it be nice to just have a bunch of links you can click to connect to servers?
I copied my backup of Desktops.aspx back so I have the original file back.
Open “Desktops.aspx” and go to line 305:
![]()
This is the code that creates the Connect button. We don’t need that in this customization, so change the code on line 305 to
<!-- <button type="button" id="ButtonConnect" name="ButtonConnect" disabled="disabled" class="formButton" onclick="BtnConnect()" accesskey="<%=L_ConnectAccessKey_Text %>"><%=L_ConnectLabel_Text %></button> -->
This change just comments out the code, it doesn’t remove it.
The result should look like this:
![]()
Now go to line number 267.
Select all the code on lines 267-276.

Replace that code with the following code:
<td align="right" valign="top" style="width:160px;padding-bottom:3px;padding-top:1px">
<label><%=L_MachineName_Text %></label>
</td>
<td width="7"></td>
<td valign="top" style="padding-bottom:4px;padding-right:4px;" colspan="2">
<table cellpadding="0" cellspacing="0" class="linkPrimaryNavigiationBar" style="width:100%">
<tr><td>
<img src="../images/logo_01.png" align="absmiddle" border="0"/>
<a onclick="document.getElementById('MachineName').value='itwrds01.itw.test';BtnConnect();return false;" href="">itwrds01.itw.test</a>
</td><td width="10"></td><td>
<img src="../images/logo_01.png" align="absmiddle" border="0"/>
<a onclick="document.getElementById('MachineName').value='itwrds02.itw.test';BtnConnect();return false;" href="">itwrds02.itw.test</a>
</td></tr>
<tr><td>
<img src="../images/logo_01.png" align="absmiddle" border="0"/>
<a onclick="document.getElementById('MachineName').value='itwrds03.itw.test';BtnConnect();return false;" href="">itwrds03.itw.test</a>
</td><td width="10"></td><td>
<img src="../images/logo_01.png" align="absmiddle" border="0"/>
<a onclick="document.getElementById('MachineName').value='itwrds04.itw.test';BtnConnect();return false;" href="">itwrds04.itw.test</a>
</td></tr>
</table>
<input name="MachineName" id="MachineName" type="hidden" />
</td>
So lines 266-290 now look like this:

Finally go to line 36:
![]()
Change that to
![]()
This changes “Connect to:” into “Connect to:” since we don’t need the hotkey on the label anymore.
Save the file and reload the RD Web Access page. Sign in if you need to, and click “Connect to a remote PC”.

I know I’m not a style guru or HTML wizard, but hey, it gets the job done.
Again, if you don’t want to make these modifications yourself you can download the modified Desktops.aspx here. This file has all the modifications mentioned above, to create the table with links. You do need to rename it to “Desktops.aspx” though.
Customizing the Connection options – “Remote desktop size:” section
The “Remote desktop size” dropdown is populated with fixed entries by default.

You can add your own sizes however.
The following customization is based on the default Desktops.aspx.
I’m going to add a custom resolution: 1440×900.
Add a new label between line 32 en line 33:
![]()
This holds the text that will be displayed in the dropdown.
Add an extra option to the dropdown between line 296 and line 297:

Renumber the options so they’re sequential again.
Go to line 723. You’ll find a function called “setRes()” there:

Remove the highlighted line (728 in my case) and replace it with the following code:
var RDPstr2 = "screen mode id:i:1\ndesktopwidth:i:";
switch(iRes) {
case 1:
RDPstr2 += "800\ndesktopheight:i:600\n";
break;
case 2:
RDPstr2 += "1024\ndesktopheight:i:768\n";
break;
case 3:
RDPstr2 += "1280\ndesktopheight:i:1024\n";
break;
case 4:
RDPstr2 += "1440\ndesktopheight:i:900\n";
break;
case 5:
RDPstr2 += "1600\ndesktopheight:i:1200\n";
break;
}
The customized setRes() function now looks like this:

Save the file and test the custom resolution entry. Word of caution though. Test this thoroughly before you take this into production. I have tested this from Windows 8.1 and Windows 2012 R2. I have no idea if this method of setting resolution also works on a different OS, etc.
If you just want to test it right away, download the modified Desktops.aspx here. Rename the file to Desktops.aspx.
Customizing the Connection options – Showing the extra options by default
By default the extra options are hidden until you click the “Options >>” button.
To always show the extra options until you click the “Options <<” button:
Go to line 224.
![]()
Change the onload event code to
onload="onAuthenticatedPageload(event);hideshowOptions();"
So line 224 now looks like this:
![]()
Save the file and reload the RD Web Access interface. All options are now shown by default.
Customizing the Devices and resources options
By default only printers and clipboard are enabled.

You can change what’s enabled by default by opening Internet Information Services (IIS) Manager on the RD Web Access server.
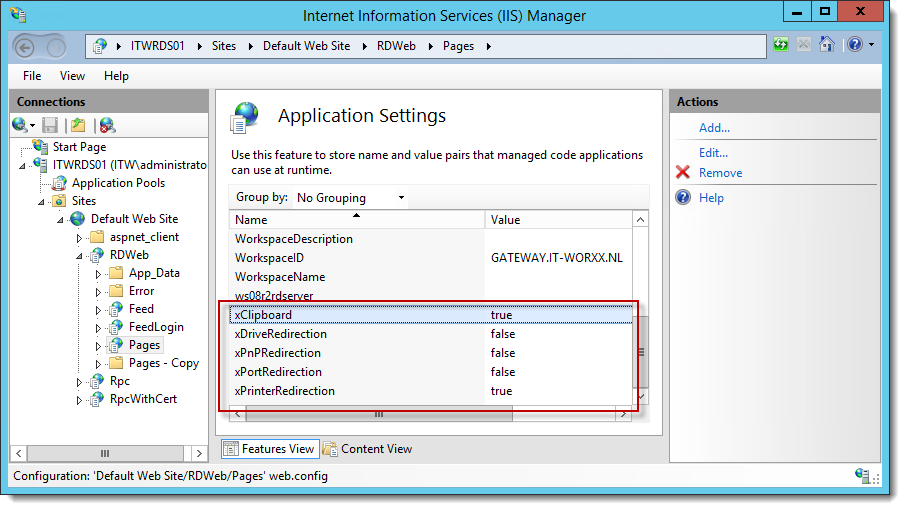
Navigate to the Pages application and then open Application Settings. The settings you’re looking for are at the bottom of the list. Enable xDriveRedirection to enable Drives by default, enable xPnPRedirection to enable Supported Plug and Play devices by default, and enable xPortRedirection to enable Serial ports by default.
Of course, if any policies are in place which prevent redirection of any of these types then none of these settings have effect, the policy will prevent the redirection.
I want to enable all types for redirection, and therefore, why should I show these options any longer?
Enable all redirection settings in the Application Settings of the Pages application in IIS. To do this, double-click each option that now has the value “false” and change this to “true”.
There’s no need to restart IIS, these settings are instantly applied. Refresh the page to check if all types are now enabled:

Now open Desktops.aspx.
Go to line 321.

That’s the highlighted line with <tr> on it.
Change this into
![]()
No go to line 378.

That’s the highlighted line with </tr> on it.
Change this into
![]()
Go to line 446.

Copy the following code:
<input type="checkbox" value="OFF" id="xPrinterRedirection" name="xPrinterRedirection" <%=IsChecked(xPrinterRedirection)%>/><input type="checkbox" value="OFF" id="xClipboard" name="xClipboard" <%=IsChecked(xClipboard)%>/><input type="checkbox" value="OFF" id="xDriveRedirection" name="xDriveRedirection" <%=IsChecked(xDriveRedirection)%> /><input type="checkbox" value="OFF" id="xPnPRedirection" name="xPnPRedirection" <%=IsChecked(xPnPRedirection)%> /><input type="checkbox" value="OFF" id="xPortRedirection" name="xPortRedirection" <%=IsChecked(xPortRedirection)%> />
And paste it between lines 446 and 447.
The result would look like this:
![]()
Now reload the page.

The Devices and resources section is gone.
Customizing the Additional options

The values shown here are the defaults. What if I wanted different defaults? For example, I’d want the default for Remote computer sound to be “Do not play”.
Open Desktops.aspx.
Go to line 397 because that is where the code for the Remote computer sound drop-down starts.
![]()
Move the highlighted code to the option value you’d like to be the default, in my case to option with value 2:

And that’s it. Now “Do Not play” is the default value for that drop-down menu. The other drop-down menus can be manipulated in a similar way. The Apply keyboard shortcuts drop-down code starts on line 410, and the Performance drop-down code starts on line 423.
The Performance option works like the Experience tab Performance drop-down in the Microsoft RDP Client:

The difference being that in RD Web Access you can’t actually see what you are changing.
Let’s visualize those options shown under “Allow the following” in the Microsoft RDP Client on the RD Web Access page as well. On a side note, for some reason it was decided that the default values for the performance options in RD Web Access differ from the default performance options in Microsoft RDP Client.
Open Desktops.aspx.
Go to line 703.
You’ll be somewhere in the middle of the function SetPerf().

The selected line here is line 703.
Delete lines 703-720 and insert the following code on line 703:
case 6:     // LAN
case 7:     // AUTO
objPerformanceOptions[0] = 1;
objPerformanceOptions[1] = 1;
objPerformanceOptions[2] = 1;
objPerformanceOptions[3] = 1;
objPerformanceOptions[4] = 1;
objPerformanceOptions[5] = 1;
objPerformanceOptions[6] = 1;
break;
default:
break;
}
objPerformanceOptions[7] = 1;
for (iIndex = 0; iIndex < objPerformanceOptions.length; iIndex++)
{
if((parseInt(document.getElementById("comboPerfomance").value) == 7) && (iIndex < objPerformanceOptions.length - 2))
{
document.getElementById("p"+iIndex.toString()).checked = false;
} else {
document.getElementById("p"+iIndex.toString()).checked = objPerformanceOptions[iIndex] == 1;
}
}
}
setPerf();
After this change line 703-729 will look like this:

This change will prepare the code to show the performance options in checkboxes, just like the Microsoft RDP Client does. Besides the code to check or uncheck the checkboxes, I also adjusted the code slightly so that the defaults for the drop down menu actually mimic the defaults in the Microsoft RDP Client.
Now go to line 435.

The selected line here is line 435.
Insert the following code between lines 434 and 435:
<tr>
<td align="right" valign="top" width="160"><label><%=L_PerformanceOptions_Text %></label></td>
<td width="7"></td>
<td valign="top" style="padding-bottom: 4px;">
<table cellpadding="0" cellspacing="0" border="0">
<tr><td><input type="checkbox" id="p0" disabled="disabled"/></td><td><label><%=L_DesktopBackground_Text %></label></td></tr>
<tr><td><input type="checkbox" id="p1" disabled="disabled"/></td><td><label><%=L_FontSmoothing_Text %></label></td></tr>
<tr><td><input type="checkbox" id="p2" disabled="disabled"/></td><td><label><%=L_DesktopComposition_Text %></label></td></tr>
<tr><td><input type="checkbox" id="p3" disabled="disabled"/></td><td><label><%=L_ShowWindowWhileDrag_Text %></label></td></tr>
<tr><td><input type="checkbox" id="p4" disabled="disabled"/></td><td><label><%=L_MenuWindowAnimation_Text %></label></td></tr>
<tr><td><input type="checkbox" id="p5" disabled="disabled"/></td><td><label><%=L_VisualStyles_Text %></label></td></tr>
<tr><td><br/><input type="checkbox" id="p6" disabled="disabled"/></td><td><br/><label><%=L_BitmapCaching_Text %></label></td></tr>
</table>
</td>
</tr>
After this change lines 430-450 will look like this:

This change actually adds the visual aspects of this customization.
Finally, go to line 20.

The highlighted line is line 20.
Insert the following code between line 19 and line 20:
const string L_PerformanceOptions_Text = "Performance options:";
const string L_DesktopBackground_Text = "Desktop background";
const string L_FontSmoothing_Text = "Font smoothing";
const string L_DesktopComposition_Text = "Desktop composition";
const string L_ShowWindowWhileDrag_Text = "Show window contents while dragging";
const string L_MenuWindowAnimation_Text = "Menu and window animation";
const string L_VisualStyles_Text = "Visual styles";
const string L_BitmapCaching_Text = "Persistant bitmap caching";
Lines 17-28 after this change:

This change adds the text for the labels in this customization.
Reload the page:

And there it is. Performance options visualized.
If you don’t feel like making these changes manually, you can download this customization here.
If you want to hide all the options, so including the Additional options, just delete the “Options >>” button altogether.
This is done by deleting line 304 in the original Desktops.aspx.
One funny thing left to mention.
There’s a typo in the code, on multiple lines. In the original Desktops.aspx check lines 419, or 423, or 688, or 770.
And that concludes customizing the Desktops page. Everything that’s customizable without touching “Branding” is now explained.
I know I said in the previous post that I would focus on Branding the entire Web Access interface in the post after this one, but this post actually concludes this series.
I will however, start a new series focused entirely on Branding.
Comments, suggestions, questions? Comment here or drop me a mail!
Arjan
30+ years experience in Microsoft powered environments. Enjoy automating stuff using powershell. In my free time (hah! as if there is any) I used to hunt achievements and gamerscore on anything Xbox Live enabled (Windows Mobile, Windows 8, Windows 10, Xbox 360 and Xbox One). Recently I picked up my Lego addiction again.

Thanks so much for this series. I can’t wait for the Branding posts.
Any way to add an RDS gateway
Hey Brian.
If a RD Gateway is part of your setup the RD Gateway you installed as part of this setup is used.
If you want to override this behaviour, you could have a look at line 454 in Desktops.aspx. That shows you that the DefaultTSGateway is read from the application options in IIS. So you could change or set the DefaultTSGateway there. Remember to set GatewayCredentialsSource as well. Set this to 4 for SSO between gateway and target server.
Arjan
Great article series, look forwards to the next one.
Thanks
Ronnie
Dear Arjan,
Hope you are doing well.
Thank you for the detailed post.
I have a question regarding RD WebAccess please.
If I access RD Web Access page I can see two Icons for the same published Application, however I have only one collection and one published App.
Only one App is accessible through RD Web Access portal which correct and if I click on the second one, it’s giving error since it’s not available anymore.
How can I clear or remove this App?
Note: I deleted and created the session collection before having this issue using the same collection name, I believe that there is conflict and that’s why it’s showing two times in the portal.
I removed all RD roles and installed them again and still the same issue.
Thank you for your support.
CNemnom
Hey CMemnom,
You could also check C:\Windows\RemotePackages\CPubFarms\CPubRemoteApps on the broker, and see if there’s an orphaned item there?
Thank you dear Arjan for your quick reply,
Yes I found the old icon and app under: C:\Windows\RemotePackages\CPubFarms\Session_Manager\CPubRemoteApps
I deleted everything under that folder since I don’t have any app published yet.
Now when I logged in to RD Web Portal again, I can see now an RDP icon for that old app instead of the icon…
How can be removed completely from the RD Web?
Thanks,
1) If you remove the Connection Broker while collections are still assigned, the collections can not properly be removed from the registry, and will therefore continue to populate in users’ RDWEB and RemoteApp / Desktop Connection lists.
2) In order to remove orphaned collection resources, first back up, then remove the expired collection entries under HKLM\SOFTWARE\Microsoft\Windows NT\CurrentVersion\Terminal Server\CentralPublishedResources\PublishedFarms (on the Broker)
Can you check that registry key?
Cheers
Thank you :)
Done!
I found the orphaned Collection Resource in the following path on RDCB server:
HKEY_LOCAL_MACHINE\SOFTWARE\Microsoft\Windows NT\CurrentVersion\Terminal Server\CentralPublishedResources\PublishedFarms\Session_Manager\Applications\
I deleted the RegKey and now the RD WebAcces is empty as expected.
It was my mistake, I removed the Connection Broker while the collection is still assigned.
I will create a new Session Collection and see how it goes.
May I ask, are you MVP?
where those detailed technical resources are available?
None has published a detailed RD Web Access Customization.
Do you have any article on how to configure Single Sign-On for RDWeb and not for RemoteApp?
Do you have a twitter account?
Thank you for your help.
Kind regards,
Glad that fixed your issue. I’m not an MVP. These resources are only available here and are based on personal experience.
I have published step-by-step guides on this blog for RDS installations, check if you can find an answer to your SSO question in these?
I have a twitter account, but don’t use it publicly.
Cheers
Hi,
I have a question.
Is it possible to HIDE a RemoteApp from PORTAL but not from webfeed?
I need that a RemoteApp (e.g. MS WORD) is not visible on my Site (http://xxxx/RDWeb) but under start menu (RemoteApp and Desktop Connections) stil VISIBLE.
Is there a way to accomplish this task?
Hello David,
Yes you can Hide a RemoteApp from the Portal very easy under the Collection Name\RemoteApp Programs\Visible in RD Web Access (Yes or No).
Hope this helps
Regards,
I knew that, but it also disappear on the start menu (under RemoteApp and Desktop Connection).
I meant that i dont want to see a remoteapp on the site, but on START MENU (added via webfeed.aspx) still visible.
Thaks
You can easily hide ALL remote apps in the web interface and still have them available in the feed. Hiding a specific app is probably possible (not sure), but not something I’ve done yet.
If you want to hide all apps I can post the code for that if you want.
Hi Arjan,
Thanks for your reply.
I actually needed only to hide some apps.
But if you have the code to hide them all I would appreciate to have it :)
Thanks
And if you have time or a code that you havent already tested but that could hide specific apps please let me know :)
Cheers
You might be interested in my latest post then :)
Hey, are you know a way to create separate folders using a rdshs 2008r2 in a rds 2012rs enviroment?
Amazing series, thnks
Hi Bandrade, I have no experience with 2008R2 session hosts in a 2012RDS environment, so can’t help you there.
I suggest you do a search in the social technet forums, or post your question there. Perhaps there’s someone to help you out. For reference: http://social.technet.microsoft.com/Forums/windowsserver/en-US/home?forum=winserverTS
Hi Arjan,
Could you please give me the code to HIDE all APPS too? (you made the great guide for hiding single apps by name)
Hi Arjan,
I was able to successfully finish all 4 parts of the RDS Labs. Thank you so much for this information. I am so far ahead in understanding this now. I do have one question that is unrelated to the labs. I am able to successfully connect to a remote pc using RDWEB from inside the network. But I can not connect to any remote pc from outside the local network. The Full Desktop to the Session host works great inside or outside the local area network. I just can not get the “Connect to a remote PC” to work from the internet. Thanks again for all your help.
Mark Lasky
Excellent series. Very informative and very helpful.
Just waiting now for the branding series! L-)
Very great write ups! Very thorough and well explained. Thank you very much!
Arjan,
I went through all your posts, great ones for sure.
I have everything working fine except the SSO for “connect to a remote PC”
SSO works fine with all published apps, internally (by passing the rd Gateway) and externally (with TS gw) BUT when I connect to a remote PC I get ALWAYS the pop-up for credentials for the TS GW and then for the target host.
What I am doing wrong ?
Hi Vince,
Did you apply the “Remove the domain prefix” modification as well? If so, review the changes, or better yet, revert the changes and see if it works “out of the box”.
Add the following line to your desktop.aspx file:
RDPstr += “promptcredentialonce:i:1\n”;
I added it after this block:
else {
RDPstr += “gatewayusagemethod:i:2\n”;
RDPstr += “gatewayprofileusagemethod:i:0\n”;
}
A lot of the functions can be learned from opening an .RDP file with a text editor.
Hope this helps!
I meant desktops.aspx
Hi Yipp,
So does your code look something like this now? I stll receive two prompts for gateway login and the desktop login.
RemoteApps launch right away as does a single desktop request via RDP direct publically using gateway and not rdweb
—————————————-
function BtnConnect()
{
var iConnectionType = 0;
var RDPstr = “full address:s:” + GetParam(“MachineName”, true, “”) + “\n”;
RDPstr += “authentication level:i:0\n”;
RDPstr += “gatewayhostname:s:” + DefaultTSGateway + “\n”;
RDPstr += “gatewaycredentialssource:i:” + GatewayCredentialsSource + “\n”;
if ((DefaultTSGateway != null) && (DefaultTSGateway.length > 0)) {
RDPstr += “gatewayusagemethod:i:1\n”;
RDPstr += “gatewayprofileusagemethod:i:1\n”;
}
else {
RDPstr += “gatewayusagemethod:i:1\n”;
RDPstr += “gatewayprofileusagemethod:i:0\n”;
}
RDPstr += “promptcredentialonce:i:1\n”;
setPerf();
RDPstr += “disable wallpaper:i:” + flipBit(objPerformanceOptions[0]).toString() + “\n”;
RDPstr += “allow font smoothing:i:” + objPerformanceOptions[1].toString() + “\n”;
RDPstr += “allow desktop composition:i:” + objPerformanceOptions[2].toString() + “\n”;
RDPstr += “disable full window drag:i:” + flipBit(objPerformanceOptions[3]).toString() + “\n”;
RDPstr += “disable menu anims:i:” + flipBit(objPerformanceOptions[4]).toString() + “\n”;
RDPstr += “disable themes:i:” + flipBit(objPerformanceOptions[5]).toString() + “\n”;
RDPstr += “bitmapcachepersistenable:i:” + objPerformanceOptions[6].toString() + “\n”;
RDPstr += “bandwidthautodetect:i:1\n”;
RDPstr += “networkautodetect:i:” + objPerformanceOptions[7].toString() + “\n”;
Hi Arjan,
Thanks a million for your step by step guide. It helped me a lot.
I have seen that you had RDP option to the desktops.aspx
I would like to start a program when connecting to a remote server.
Would you know how could i do that ?
Thank you
Greetings
Jo
Hi Jo,
To do that you’d need to take a look at the function BtnConnect() in Desktops.aspx.
That function is responsible for building the RDP file a user opens when he or she connects through Desktops.aspx.
I haven’t tested this, but I think you need to add 2 lines to that function:
alternate shell:s:
shell working directory:s:
So if I would like to start internet explorer upon log in I would add this to the function:
RDPstr += “alternate shell:s:C:\\Program Files (x86)\\Internet Explorer\\iexplore.exe\n”;
RDPstr += “shell working directory:s:C:\\Program Files (x86)\\Internet Explorer\\\n”;
Again, untested, but that’s probably what you should look into.
Another option would be to handle it server side, using the Run key in the registry, Group Policy, scripts, or whatever.
You rock Arjan.
Thank you for this answer. Indeed it seems to be the good way, even if not working yet :(
As you suggested, I have inserted those 2 following lines in the function BtnConnect()
RDPstr += “alternate shell:s:”C:\Airbus\LPC-NG\LPC-NG.exe”\n”;
RDPstr += “shell working directory:s:”C:\Airbus\LPC-NG”\n”;
I am getting this weird VBScript Remote Desktop Connection message, when attempting to connect or even to click options ==>
To use this web site, your computer must be running the remote desktop Connection (RDC) Client.
To continue, install the latest RDC client and the most recent updates from the Microsoft Updates…
As soon as i remove my 2 additional lines, everything works fine. Does it maybe means that those commands can only be executed from the proper MSTSC program ?
It cannot be the RDP version, I am running Windows 8.1, so it’s version 6.3. I have also tried from Win 7.
Would you please have an idea ?
Thank you so much for your help
Jo
Hi Jo,
If those lines you posted are the lines you added, it will never work.
You cannot use double-quotes within double-quotes, if that makes sense?
And the backslashes in a program’s path should be escaped with an extra backslash.
Change the lines to:
RDPstr += “alternate shell:s:’C:\\Airbus\\LPC-NG\\LPC-NG.exe’\n”;
RDPstr += “shell working directory:s:’C:\\Airbus\\LPC-NG’\n”;
You should definitely be able to add those lines without errors on the page.
Thank you Arjan,
Alternate shell seem not working, but I have used a local script instead.
It works perfectly.
Would you know how to bypass this unknown publisher alert when trying to connect to a server via btnconnect (desktops.aspx page)
My server is well trusted and also in sha1 thumbprints policies. It works without any warning with my remoteapps.
Thank you again
Jo
Hi Jo,
I think the RDP file that is generated on that page is unsigned. I have yet to research if it is possible in code to sign the generated RDP file..
Arjan,
Your series on modifying the RDWeb interface has been most helpful!
I’d like to enable multi-monitors when connecting in using the “Connect to a Remote PC” link. My use case is I have a user that has multi-monitors on their desktop at work and they have multi-monitors on their desktop at home.
When they remote in using the “Connect to a Remote PC” link, they only get one monitor. Is it possible to enable multi-monitors using this?
Thanks!!
Darhl
Hi Darhl,
That should be possible, although I haven’t tested it.
In Desktops.aspx find the function BtnConnect().
It should have a bunch of lines starting with RDPstr. One of the last ones is:
RDPstr += getUserNameRdpProperty();
Now just insert a new line just before that one with the following code:
RDPstr += “use multimon:i:1\n”;
After this the last couple of lines of the RDPstr lines should look like this:
RDPstr += “autoreconnection enabled:i:1\n”;
RDPstr += “use multimon:i:1\n”;
RDPstr += getUserNameRdpProperty();
RDPstr += “”;
I got this line from a saved RDP file. Not sure if this will work in the web version, but this is definitely your best bet.
That worked like a champ! Thanks so much!!!
Hi Arjan
Please can you advise if you have a way of changing the default icon view to a list view in RD Web Access.
Regards
Adolph
Hi Adolph,
The only option you have is to edit the xsl templates that define the way an app icon looks, and the panel that defines the way the app icons are rendered.
Hi Adolph
do you still need the list view? I just manged to solve it by changing some styles in tswa.css.
Regards
Dieter
Hi Arjan,
Can you tell me why when connecting to the rdweb interface instead of starting a web session it downloads me an .rdp file. How to restore previous settings.
Hi Kos mOS,
Two things could be happening: you are either not using Internet Explorer, but Edge or Firefox or Chrome, or the ActiveX doesn’t load properly. Either way, it’s a browser issue.
Hi Arjan
Great series of articles. Made setting up and customising remote desktop web access a much easier experience.
One question. We come from a citrix background, where we normally publish a full desktop and set the screen size to be 95% of the client area. This way the user has a windowed desktop, with its own start menu, that has no scroll bars and gives them as much usable real estate as practical.
Is this possible in Remote Desktop?
Fantastic guides! Huge appreciation for this concise user-friendly effort!
Thank you Matthew!
Thank you so much for these. I was able to take what you did in this post and combine it with the basic code from your post about adding the Display Name to the Logout box and now I set an AD Attribute and automatically populate the “Connect To A PC” with the persons main computer.
Hey Sam,
That’s awesome!
Arjan, I’ve been looking around forever for a method to auto populate the domain when using the remote to a PC tab. I’ve modified this page largely with the dropdown method you proposed which works great but I’m trying to remove the requirement to put domain\username in the rdgateway credentials box when it comes up after hitting “connect”.
I have the login for the first login.aspx page working fine without the domain requirement per your other article.
2012 R2 rdweb
Great Series Arjan. I have a question which is not related to customization but you may have some insights into that.
In the XML response that comes back after logging in to the Web Access, there’s a Resource ID param – Do you know where is this ID coming from? someway for me to find IDs for all session collections in my RDP setup thought Windows CLI?
Great Post Arjan.
I have a requirement. request you to please help me.
I need to remove the word RemoteApp from the message box that appears when we click on a published program. Is there a way to hide that box entirely or show something else while my users are waiting for the program to open.
Thanks in advance
It is possible to specifiy “startup programs” for each server listed in the drop down box”Connect To” under “connect to a remote PC” ?
Hi taro,
Yes it is. Read the index from the selected server list, then read that index from an array of startup programs and add that to the definition of the rdp file.
Thank you, is it still achievable if my RD Gateway in DMZ is in workgroup environment instead of domain?
I tried “Replacing the textbox with a pre-populated drop-down” on 2012 R2 which works fine but on 2016 R2 it goes to error condition. Appreciate if someone post the code for 2016 R2 server.
Arjan,
I wonder if you have ever toyed with customising the RDWebFeed? We are using this internally to push our published remote desktop collections to client devices automatically, which works great.
What I would love, is to insert manual items into the feed based on security group membership, so IT staff can have a published set of RDP connections for example, or specific end users being able to see custom RDP connections for their remote PCs or similar.
Also, do you know of any way to allow a user to select whether or not to use all monitors when connecting to a session collection via the web access page? We have customised to turn the option to use all monitors by default, but doesn’t seem to be a user selectable option.
Cheers
Did you ever do the branding series? Thanks
Should have been more clear, branding in Server 2016? The instructions for changing the Work Resources title doesn’t seem to work in Server 2016. It keeps telling me that the module isn’t found.
Also, do you know of a way to change the pane size once you log in? That is the pane that shows all the desktop collections.
Tip: I think the locations of the you are looking for to remove the grey separators on the sign in pane have changed in Server 2016. I found searching for the color CCCCCC gave me two sets of html code. Simply deleting those two sets of code eliminated the grey separators.
Arjan, I’ve been looking around forever for a method to auto populate the domain when using the remote to a PC tab. I’ve modified this page largely with the dropdown method you proposed which works great but I’m trying to remove the requirement to put domain\username in the rdgateway credentials box when it comes up after hitting “connect”.
I have the login for the first login.aspx page working fine without the domain requirement per your other article.
2012 R2 rdweb