Or, “Toying around with OwaVirtualDirectory to ‘customize’ the logon page”.
This post will show you some cool things you can do with the Outlook Web Application (OWA) login page, out of the box.
Unlike RD Web Access login page tweaks, you don’t need to edit XSL files, HTML files or any other files, this is all done with Powershell.
We’ll be using two cmdlets throughout this post: Get-OwaVirtualDirectory and Set-OwaVirtualDirectory.
For a reference of both cmdlets see Get-OwaVirtualDirectory and Set-OwaVirtualDirectory.
Let’s get started.
Here’s my OWA login page.

Since I’m Dutch, my default browser language setting is Dutch and OWA picks that up. All the labels are in Dutch.
To change that you’d need to change the browser’s language setting.

There. Changed it to English so most of you won’t have a hard time reading the labels.
As you can see the login page expects the user to enter an NTUserName format, or DOMAIN\USER NAME.
If you want to change that to Username only you need to set two parameters.
Get-OwaVirtualDirectory | Set-OwaVirtualDirectory -DefaultDomain < domain name> -LogonFormat UserName
This will do two things. The first thing is that entering the domain is now optional and no longer required. The second thing is that the label text “Domain\user name:” is changed to “User name:”. Restart IIS to apply this change.

Users can still log in using an NTUserName format if they want to.
If you have Exchange installed in a multi-tenant environment, or if you require your users to log in using their UPN (User Principal Name), you need a different value for the LogonFormat parameter.
Get-OwaVirtualDirectory | Set-OwaVirtualDirectory -LogonFormat PrincipalName
If the DefaultDomain parameter is no longer empty in your environment when you decide to change to UPN logon, use the following command instead:
Get-OwaVirtualDirectory | Set-OwaVirtualDirectory -LogonFormat PrincipalName –DefaultDomain $null

Users can still log in using an NTUserName format if they want to.
Notice how the label conveniently changes from “Domain\User name” or “User name:” to “Email address:”? No need to explain to all those users what “User Principal Name” is. Of course you do need to make sure that a user’s UPN matches a user’s email address or this won’t work so well.
Let’s go back in time a few years.
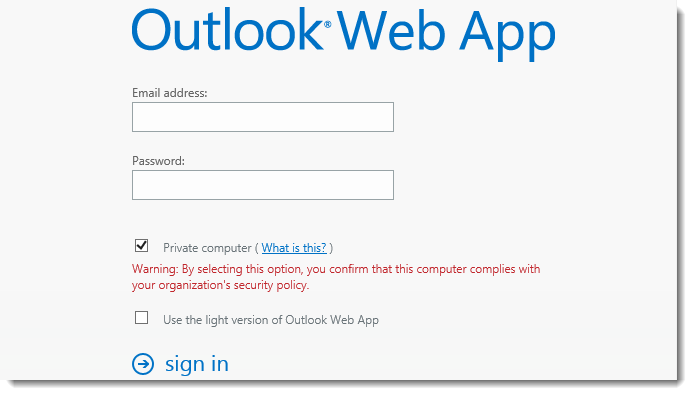
Outlook Web Application as it was out of the box in Exchange 2010 (Published with TMG 2010 in this screenshot but that’s beside the point):

It lets the user choose whether he’s using a private or a public computer. Also known as the Security setting. Effectively this settings switches between timeout values for automatically ending the web session.
To bring back this option to OWA use the following command:
Get-OwaVirtualDirectory | Set-OwaVirtualDirectory -LogonPagePublicPrivateSelectionEnabled $true
Although executing this command doesn’t tell you to, you need to IISreset to activate this setting.

Also notice that “Private computer” is selected by default.
If you want the user to be able to opt for the Light Version, issue the following command:
Get-OwaVirtualDirectory | Set-OwaVirtualDirectory -LogonPageLightSelectionEnabled $true
Again, the output doesn’t tell you, but you need to IISreset to activate this setting.
If you don’t like the blue version of the Outlook Web App, you can change the default theme. This does not change the logon page theme however! To change the appearance of the logon page you, unfortunately, still need to edit some files.
There is a command to change the default theme though:
Get-OwaVirtualDirectory | Set-OwaVirtualDirectory -DefaultTheme <theme name>
To find a list of theme names, browse to <Exchange installation folder>\V15\ClientAccess\Owa\<latest installed version>\themes on your Exchange (Client Access) server. The folder names shown there are the theme names.
For example, if I execute the following command:
Get-OwaVirtualDirectory | Set-OwaVirtualDirectory -DefaultTheme paint

Users who never changed their theme will now have the “Paint” theme when they log in. The logon page is still unthemed and cannot be skinned using the two cmdlets I’ve been using so far.
There are a lot of other options to explore in OwaVirtualDirectory cmdlets, but the settings explained in this post are the ones you need if you want to enable or disable features and options on the logon page.
Maybe I’ll do a post on the other options if I see the need. I’ll look around skinning options and see if a post about branding is in order as well.
Arjan.
30+ years experience in Microsoft powered environments. Enjoy automating stuff using powershell. In my free time (hah! as if there is any) I used to hunt achievements and gamerscore on anything Xbox Live enabled (Windows Mobile, Windows 8, Windows 10, Xbox 360 and Xbox One). Recently I picked up my Lego addiction again.

Nice work Arjan.
Hello Great post. one question, how can we make it default private computer unchecked?
Thanks.
Hi Harry,
This cannot be done using the shell.
Make a backup of and then open the file “logon.aspx” from c:\Program Files\Microsoft\Exchange Server\V15\FrontEnd\HttpProxy\owa\auth
Find line 238:

Change that to:

Save the file, restart IIS.
Should do the trick.
Hi, is it possible to add labels in a label file somewhere? I do not want to write text directly into the html page since it won’t be language sensitive. Thank you in advance! /J
Hey, how can i change the Text …. “Private Computer” to “Workstation” in german: “Privater Computer” to “Arbeitsplatzrechner” i have the order …. thx
i add google recaptcha script into owa logon.aspx file.but users can logon withou recaptcha varification , who know how to fix this issue?
Hi Surac, no I don’t. Can’t help you, sorry.
It keeps saying it doesn’t exist. Why is that?
Hi Sesy,
Maybe because it has been 7 (!) years since this post and things may have changed since in Exchange 2013? Time to upgrade I say.