A step by step guide to build a Windows 2012 R2 Remote Desktop Services deployment.
Part 4 – Publishing RemoteApp programs.
If you missed the previous parts:
Step by Step Windows 2012 R2 Remote Desktop Services – Part 3: Adding Session Hosts and Load Balancing session collections
Step by Step Windows 2012 R2 Remote Desktop Services – Part 2: Deploying an advanced setup
Step by Step Windows 2012 R2 Remote Desktop Services – Part 1: Deploying a single server solution
I’ll be using the setup I demonstrated in Part 2 – Deploying an advanced setup because this setup was still on my Windows 8.1 Hyper-V setup. As a reminder, here’s the setup again:

Everything is up & running, so this guide won’t be focusing on building the Remote Desktop Services deployment itself.
Perparing for publishing a RemoteApps collection
By the end of Step 2 in this series I had a Full Desktop session collection fully functioning. To prepare the lab for RemoteApps I can simply click the Full Desktop session collection and click the “Publish RemoteApp programs” link as shown in this screenshot:
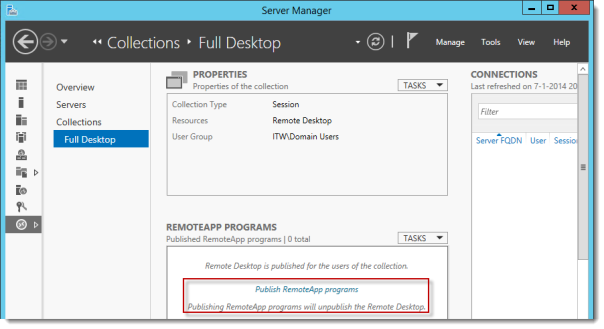
Doing so will convert the Full Desktop session collection to a RemoteApp programs collection, as mentioned in the remark below the link.
Publishing a RemoteApps collection
Click the Publish RemoteApp programs link.
Select RemoteApp programs
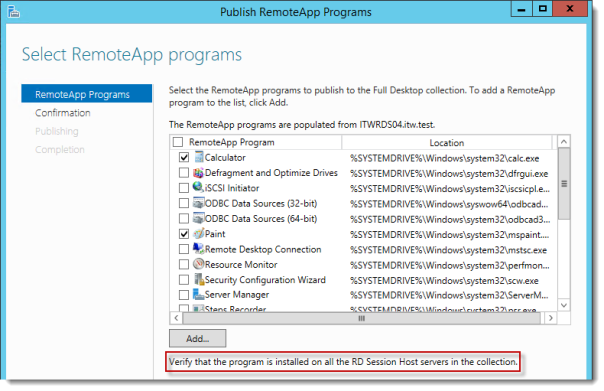
Immediately you are presented with a list of available applications. If you have multiple servers in the collection pay attention to the text I highlighted in the screenshot.
If you want to publish programs that are not in this list use the Add button to browse to the program you want to publish. Note that you need to browse to a UNC path, not a local disk on the RD Session Host.
I selected Calculator, Paint and Wordpad.
As you can see, Notepad is missing by default.
Click Add.
Open
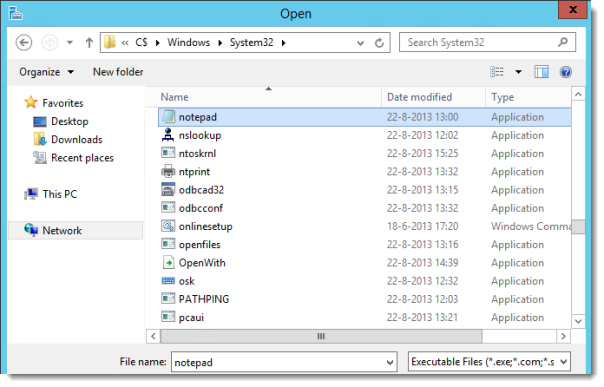
Browse to \\itwrds04\c$\windows\system32 and select notepad.exe there.
If I browse to C:\Windows\System32 and select notepad.exe:
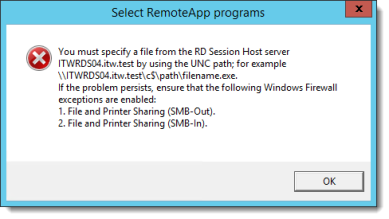
So browse to Notepad.exe using the UNC path and click Open.
Click Next.
Confirmation
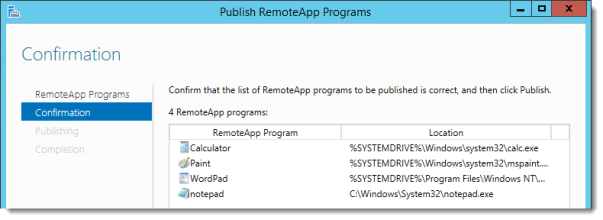
On the Confirmation page you can see the UNC path is no longer visible, but is now shown as the actual path.
Click Publish.
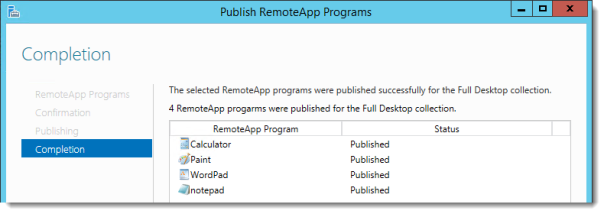
The applications you selected will be published.
Server Manager
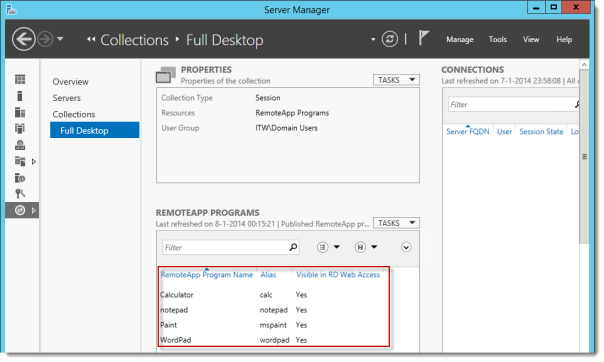
You’ll return to Server Manager and you can see the applications that were just published in the RemoteApp programs sections, including basic properties like Alias and Visible in RD Web Access.
Let’s finish the collection.
Finishing the RemoteApp programs collection
Server Manager

In the properties section for the Full Desktop collection click Tasks and then click Edit Properties.
Session Collection
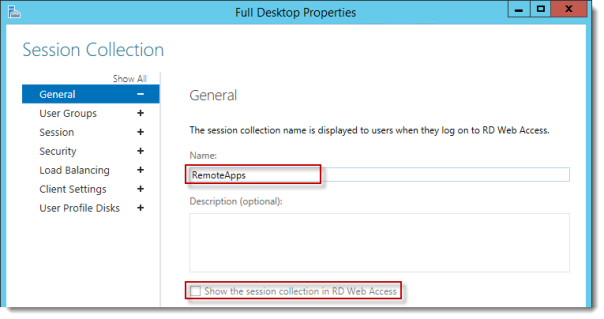
Rename the collection to something more meaningful than “Full Desktop”. Also notice that “Show the session collection in RD Web Access” is now greyed out since it’s no longer a session collection.
Click Next.
User Profile Disks
Review the settings in User Groups, Session, Security and Load Balancing, and adjust the settings in each section to your likings.
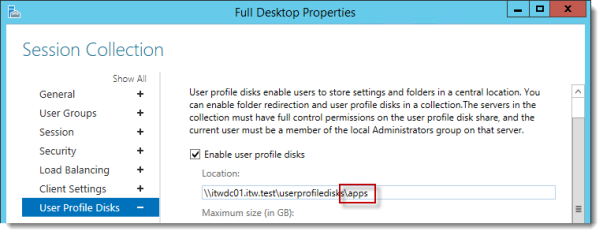
In User Profile Disks I changed the profile disks location to a different folder. Although that’s not really necessary in this setup it’s good practice to give each type of collection its own location for profile disks. Especially so if you’re planning for multiple types of collections in a single deployment. The reason I do this is because profile disks can’t be shared across types of collections. That’s right. You can’t. This means that if you have a deployment that supports Virtual Desktop Infrastructure (VDI), Remote Desktop session collection(s) and RemoteApp programs, you’ll have three different profile disks for each user. In deployments with a large number of users you’ll quickly see the need for a nice little tool like Sidder ;)
Click OK.
Now log in to the RD Web Access:

It works, but we’re not done yet.
Editing a RemoteApp program
When we added Notepad.exe in the Wizard it created a RemoteApp called “notepad”. Let’s use this RemoteApp to demonstrate what we can manage for RemoteApps.
Server Manager

In the RemoteApp programs section, right-click notepad and click Edit Properties.
General
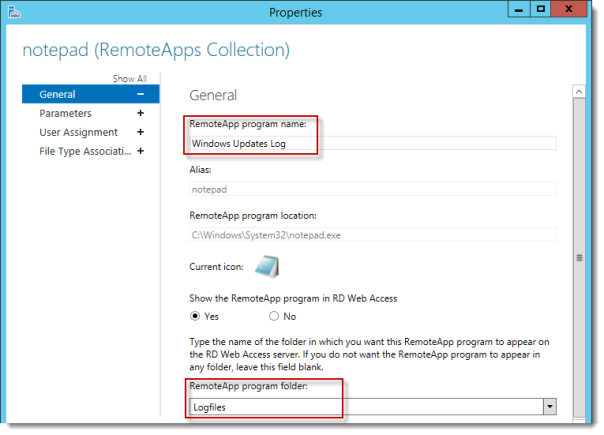
On the General page we can edit several attributes for our notepad RemoteApp.
We can change the RemoteApp program name. This is the name that is displayed in RD Web Access. Change this to “Windows Updates Log”.
We cannot change the RemoteApp’s alias here. You can only change the alias by deleting the RemoteApp and re-creating it using Powershell. More on that later.
We cannot change the RemoteApp’s program location here.
We cannot change the current icon here.
We can select to hide or show the RemoteApp in RD Web Access.
And we can select a Folder for the RemoteApp. If you click the dropdown menu you’ll notice it is empty. Don’t worry, just type in the folder name. Enter “Logfiles” here. This is the way to add new folders. If you have created folders before, you can select them using the dropdown menu.
Click Parameters.
Parameters
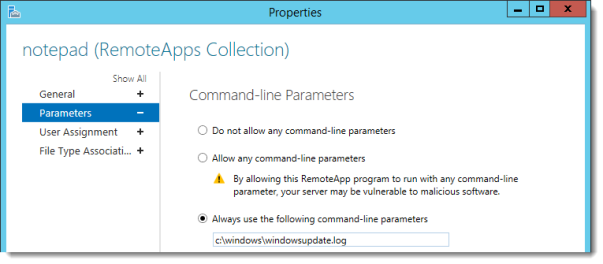
If your RemoteApp program needs any parameters to run, this is the place to enter them. Enter “c:\windows\windowsupdatelog” for this one.
Click User Assignment.
User Assignment
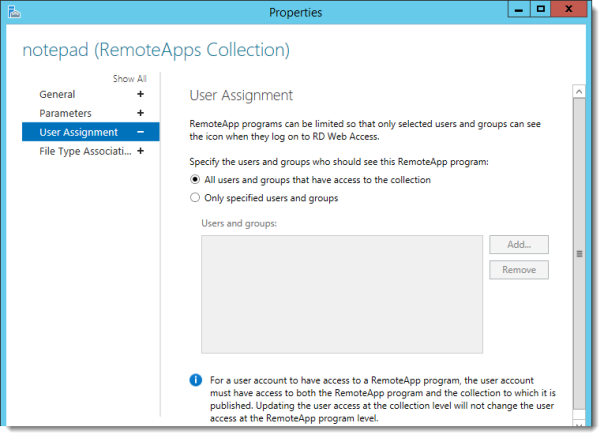
You can fine-grain user assignment on RemoteApp program level. For example, you can publish the complete collection to Domain Users, but limit this application to Domain Admins or Log Admins. In this case the Logfiles RemoteApp folder will be hidden for Domain Users as well, since this is the only application in this folder.
Review the remark in the bottom of the screenshot.
Click File Type Associations.
File Type Associations
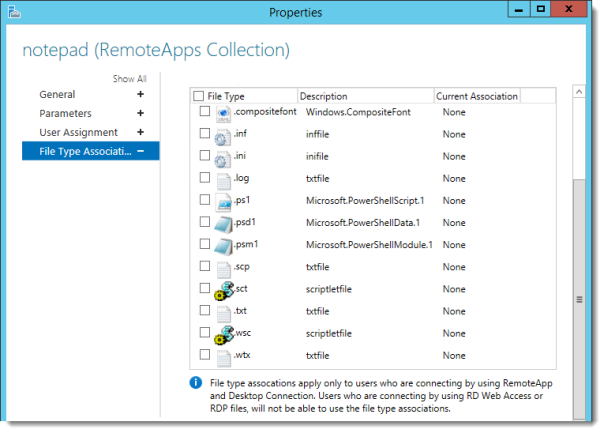
You can set desired File Type Associations for your RemoteApp program here. Take notice of the remark when you scroll down. What this means is that associations will only take effect if the RemoteApp is started through “Connected RemoteApp and Desktop Connections”, and not if you start it using custom RDP files, or through RD Web Access.
Since we just changed this one to publish the Windows Update Log, we don’t need any File Type Associations, I’ll get back to this later.
Click OK.
Review the list of RemoteApp programs and notice the change in RemoteApp Program Name:
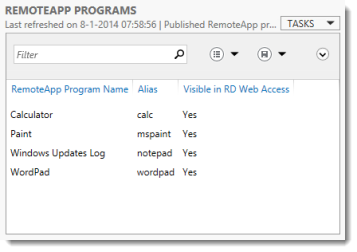
Refresh or log in to the RD Web Access and review these changes:

Here’s the folder we entered.

Clicking the folder shows the RemoteApp we just published.
Note: if you want to customize views like these, check out another step by step series I am publishing.
Click Windows Updates Log.
Windows Updates Log

And it works.
Using Powershell to manage RemoteApp programs
Get-RDRemoteApp (http://technet.microsoft.com/en-us/library/jj215454.aspx) is used to list properties for RemoteApps.
Example:
Get-RDRemoteApp -alias "wordpad" | fl
Set-RDRemoteApp (http://technet.microsoft.com/en-us/library/jj215494.aspx) is used to set properties for RemoteApps.
Example:
Set-RDRemoteApp -Alias "wordpad" -DisplayName "WordPad - Renamed"
New-RDRemoteApp (http://technet.microsoft.com/en-us/library/jj215450.aspx) is used to create a new RemoteApp in a certain collection.
Example:
New-RDRemoteApp -CollectionName "RemoteApps" -Alias "regedit" -DisplayName "RegEdit" -FolderName "Admin Tools" -FilePath "C:\Windows\regedit.exe"
Remove-RDRemoteApp (http://technet.microsoft.com/en-us/library/jj215493.aspx) is used to remove a RemoteApp.
Example:
Set-RDRemoteApp -CollectionName "RemoteApps" -Alias "wordpad"
Get-RDAvailableApp (http://technet.microsoft.com/en-us/library/jj215457.aspx) is used to list available applications to publish in a collection.
Example:
Get-RDAvailableApp -CollectionName "RemoteApps"
Get-RDFileTypeAssociation (http://technet.microsoft.com/en-us/library/jj215461.aspx) lists the filetype association(s) for a certain application.
Example:
Get-RDFileTypeAssociation -AppAlias "wordpad"
Set-RDFileTypeAssociation (http://technet.microsoft.com/en-us/library/jj215459.aspx) is used to set the filetype association(s) for a certain application.
Example:
Set-RDFileTypeAssociation -CollectionName "RemoteApps" -AppAlias "wordpad" -FileExtension ".txt" -IsPublished $True -IconPath "%ProgramFiles%\Windows NT\Accessories\wordpad.exe" -IconIndex 0
And that concludes this step by step on publishing RemoteApp programs.
In the next part of this series I will show how to use and configure the “Connected RemoteApp and Desktop Connections” in combination with this setup.
Arjan
Love the article, so was hoping that you have done one about setting up a Domain for the first time and the best practices to follow. If you have could you share the link? Or if you know of a good article that you could point me to, that would be great as well!
Thanks for posting this well written comprehensive article. Much appreciated.
What can i do to make the remote app programs accessible externally outside the internal network. I have been able to publish the full desktops to external users using rds gateway server but its not working for remote app programs. Any special configurations required for that.
I was wondering the same thing. I couldn’t find anything on the internet so i looked around and figured it out. Go into the rd broker server and open up server manager, then into remote desktop services under overview and edit the deployment properties. Where it says rd gateway, you fill out the gateway server settings and make sure the option for “Bypass rd gateway server for local addresses” is unchecked. After you apply those settings, open google chrome and log into the web interface. When you click on one of the web apps it will download a .rdp file with the gateway settings you specified earlier. Then you distribute the file.
Arjan,
I am setting up a new DC and we are using a network share to hold the files. Do you know of a work around or a way to make a published app based on a network share? The typical way will not work nor with the creation in powershell? Ideas?
I think i know what you’re trying to do. You need to publish explorer.exe as a remote web app. Then under the web app properties, go under parameters and click “always use the following command line parameters” then type in the network path for the share. example: \\Servername\Sharedfolder
or if the user has the share mapped to them, use the drive letter. example:
W:\
Hi,
Thanks for your post!!!
To get the UPD share high available, what is the best technology to achieve it?
DFS or SOFS.
Thakns..
Hi ngoug,
SOFS. I’d advise against DFS to prevent file locking issues.
Hi Aryan,
Thanks you for post.
Users is using local profil to connect on rds server on 2008 r2, i want to migrate rds services to rds 2012 R2, i want to know a good process to move profile from local to UPD .
I have one suggestion : local –> Folder redirection –> roaming profil –> UPD.
I’m going to test local to folder redirection to test if data will be copied because no downtime will be occured while migration.
Thank in advance.
Arjan,
Thank you for putting these very excellent four steps together. It has been very helpful and saved me a lot time.
Are you still planning on writing the fifth part? Also, are there any differences in setting this up on 2016 server?
Best regards,
TW
Thanks you again Medim for this post,
I have a permanant problem on my RDS Farm.
Each time I restart RDSSH and RDSCB servers, I get the following error:
“”The server pool does not match the servers in the Broker service for Remote Desktop Connections that it contains. errors:
Cannot connect to any of the Broker servers for the specified Remote Desktop connections. Make sure no servers are available and Remote Desktop Management Services (rdms) Service Broker for Desktop Connections (tssdi). Administration of connections to RemoteApp programs and Remote Desktop Services (tscpubrpc) are running.””
To resolve this issue, i restart services, but in production environnement, it’ll not possible to restart service.
Is there a way to fix it?
Thank you for your reply.
Hello everyone,
Can someone give me an answer?