A step by step guide to build a Windows 2012 R2 Remote Desktop Services deployment.
Part 2 – Deploying an advanced setup.
In part one I detailed how to do a single server installation. In case you missed it, or want to check it out, look at this post: https://msfreaks.wordpress.com/2013/12/09/windows-2012-r2-remote-desktop-services-part-1/
In this step by step guide we’ll be building a more complex setup:

As you can see we’ll deploy 3 certificates in this setup. The names I will use for this will be “webaccess.it-worxx.nl”, “gateway.it-worxx.nl” and “broker.it-worxx.nl” for obvious reasons. You may consider using a wildcard certificate.
Software used in this guide: Windows Server 2012 R2 ISO (evaluation can be downloaded here: http://technet.microsoft.com/en-us/evalcenter/dn205286.aspx)
SQL Server 2012 SP1 Express x64 With tools (free version can be downloaded here: http://www.microsoft.com/en-us/download/details.aspx?id=35579. After clicking the download button select SQLEXPRWT_x64_ENU.exe)
SQL Server 2012 SP1 Native Client (free version can be downloaded here: http://www.microsoft.com/en-us/download/details.aspx?id=35580. After clicking the download button select ENU\x64\sqlncli.msi)
And three certificates. I got mine for free from https://startssl.com. The certificate need to contain the FQDNs you will use for publishing the RD Web Access (webaccess.it-worxx.nl) and RD Gateway (gateway.it-worxx.nl) roles. You’ll also need one for the RD Broker role, even though we won’t publish this server to the internet. The files need to be in .pfx format and you need to have the private key in them.
As in the previous guide, this guide will not focus on building a domain using a single domain controller and adding the other servers as member servers to this domain.
And again some basic knowledge is assumed in this guide.
I will be using Hyper-V 3.0 on my Windows 8.1 laptop and I have prepared 5 servers. The servers will be similar to the 2 I used in the previous guide. All servers have the .NET Framework 3.5 added as a feature.
All servers have 1vCPU, 512MB memory, and a dynamic 60GB Harddisk) I configured ITWDC01 as a Domain Controller in a new forest: itw.test.
I added the rest of the servers as member servers to the itw.test domain and configured them to use ITWDC01 as their primary DNS server.
Installing the Remote Desktop Services Roles
Log on to the Domain Controller, and in Server Manager right-click the All Servers node and add all other servers using the Add Servers command (or select the All Servers node, click Manage and click Add Servers).

Now that all servers needed in this deployment scenario are present, click Manage, and click Add Roles & Features.
Before you begin

Click Next.
Select Installation Type

Select Remote Desktop Services installation. Click Next.
Select Deployment Type

Select Standard deployment.
Click Next.
Select Deployment Scenario
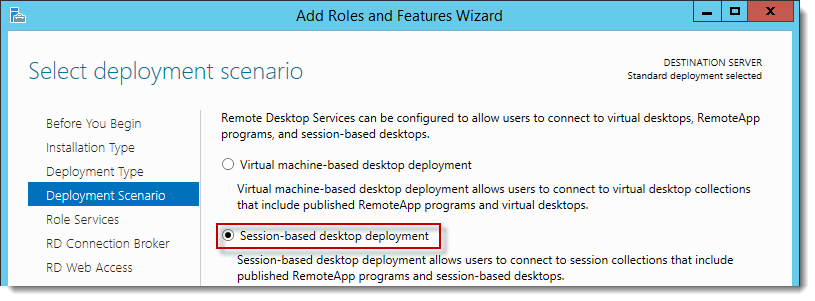
Select Session-based desktop deployment. The other option will be a different post in this series.
Click Next.
Review Role Services

Review the services that will be installed.
Click Next.
Specify RD Connection Broker server

Click the preferred server and click the Add button.
Click Next.
Specify RD Web Access server

Click the preferred server and click the Add button.
Click Next.
Specify RD Session Host server

Click the preferred server and click the Add button.
Click Next.
Confirm selections
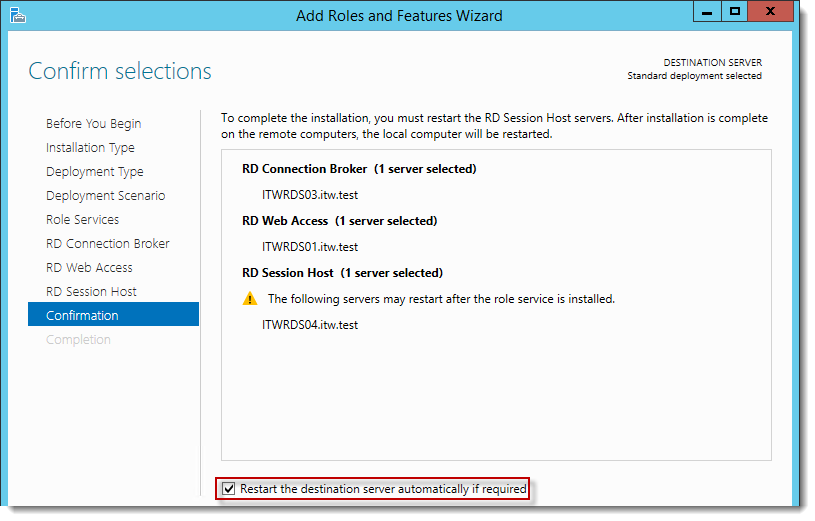
Check Restart the destination server automatically if required.
Click Deploy.
View progress

Wait until all role services are deployed and the RD Session Host server has restarted.
Click Close.
In Server Manager click Remote Desktop Services and scroll down to the overview.

As you can see the deployment is missing a RD Gateway server and a RD Licensing server.

Click the Add RD Licensing server button.
Select a server
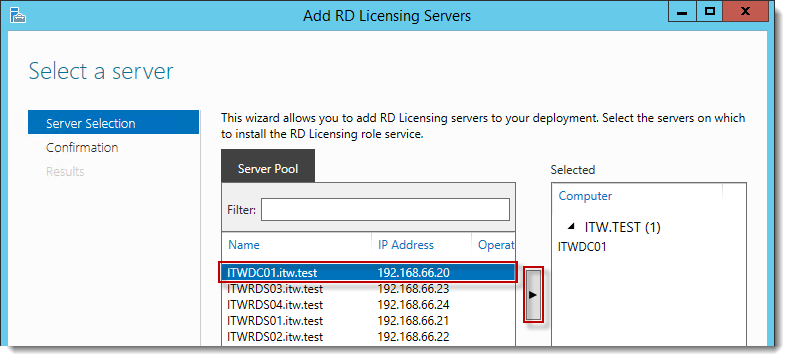
Click the domain controller and click the Add button.
Click Next.
Confirm selections

Click Add.
View progress

Wait until the role service is deployed. No restart is needed.
Click Close.

Click the Add RD Gateway server button.
Select a server

Click the correct server and click the Add button.
Click Next.
Name the self-signed SSL certificate

The wizard creates a self-signed certificate. We will deal with certificates in this deployment in a little bit. Enter the external Fully Qualified Domain Name for the Gateway URL. In my case, for lack of a better name, I used “gateway.it-worxx.nl.
Click Next.
Confirm selections

Click Add.
View progress

Wait until the role service is deployed. No restart is needed.
Notice that “gateway.it-worxx.nl” was configured for the deployment as a FQDN.
Also notice that certificate configuration is needed.
Notice the link in the bottom to “Review the RD Gateway properties for the deployment”.
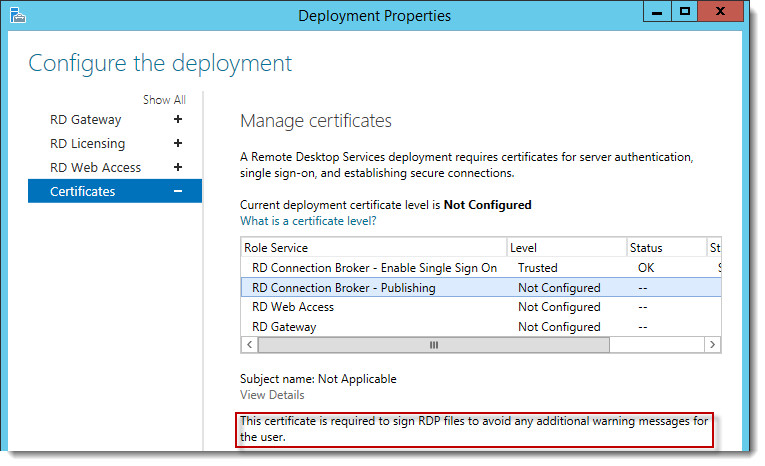
Click Configure certificate.
Configure the deployment

Click RD Connection Broker – Enable Single Sign On.
Notice the purpose of this certificate.
Click Select Existing Certificate.
Select Existing Certificate

Click Browse to browse to the .pfx which you prepared for the RD Connection Broker server, enter the password for that .pfx and check “Allow the certificate to be added to the Trusted Root Certification Authorities certificate store on the destination computers”.
Click OK.

Click Apply to apply the certificate changes. Do not click OK because we need to configure the other certificate options as well and we can configure only one at a time.
Configure the deployment
Select RD Connection Broker – Publishing.
Notice the purpose of this certificate.
Click Select Existing Certificate and add the same certificate you added for RD Connection Broker – Enable Single Sign On.
Click Apply to apply the certificate changes. Do not click OK because we need to configure the other certificate options as well and we can configure only one at a time.
Configure the deployment

Select RD Web Access.
Notice the purpose of this certificate.
Click Select Existing Certificate and add the certificate you prepared for the RD Web Access server.
Click Apply to apply the certificate changes. Do not click OK because we need to configure the other certificate options as well and we can configure only one at a time.
Configure the deployment

Select RD Gateway.
Notice the purpose of this certificate.
Also notice that we need to restart the RD Gateway server after we configured it to use the certificate.
Click Select Existing Certificate and add the certificate you prepared for the RD Gateway server.
Click Apply to apply the certificate changes. Do not click OK because we need to configure the rest of the deployment options, since we already have this wizard open.
Configure the deployment

Review the RD Gateway settings and notice what settings are available.
Click RD Licensing.
Configure the deployment

Notice that a RD License server is available, but no license type is selected yet.
I selected Per User, but since this is just a demonstration setup, it really doesn’t matter.
Click RD Web Access.
Configure the deployment

By default the RD Web Access IIS application is installed in /RdWeb. If you want to know how to change this, check another post: https://msfreaks.wordpress.com/2013/12/07/redirect-to-the-remote-web-access-pages-rdweb/
Click OK, and click Close to finish the RD Gateway wizard.
Reboot the RD Gateway server.
Open DNS Manager on the domain controller and browse to Forward Lookup Zones.

Right click Forward Lookup Zones and click New Zone… Go through this wizard accepting the defaults until you have to enter a Zone Name.

Enter the external FQDN which will also be used by the Connection Broker (which is also on the RD Connection broker’s certificate.
Finish the rest of the wizard accepting the defaults.
Browse to the newly created zone.

Right click the newly created zone and click New Host (A or AAAA)…
New Host

Leave the Name field blank, but enter the member server’s (holding the RD Connection Broker role) internal IPv4 address.
Click Add Host.
Repeat these DNS steps for gateway.it-worxx.nl and for webaccess.it-worxx.nl.

We’ve effectively enabled the deployment to be useable by internal users as well by configuring these DNS zones.
Create a new Global Security Group called “RDS Connection Brokers” and add the computer account for the member server holding this role to it as a group member.
We need this group to be able to convert the RD Connection Broker to a highly available RD Connection Broker. You’ll see why we need to do this in a few steps.
Reboot the member server holding the RD Connection Broker role to let it know it’s a member of the RDS Connection Brokers security group.
Install SQL Express on the Domain Controller (or use an existing SQL Server if you already have one). For a list of needed features, and a little more detail visit Part 1 of this series, https://msfreaks.wordpress.com/2013/12/09/windows-2012-r2-remote-desktop-services-part-1. That post lists the does and don’ts for using SQL Express with an RD deployment. This includes adding the SQL login for the RD Connection Broker servers. Do not continue with this guide unless you have a working and configured SQL environment.
Install the SQL Native Client on the member server holding the RD Connection Broker role (Client Components only). Install the client which corresponds to your SQL Server version!
Everything we need is in place to convert the RD Connection Broker, so let’s do just that. This procedure is similar to the single server setup.
In Server Manager click Remote Desktop Services and scroll down to the overview.

Right click RD Connection Broker and click Configure High Availability.
Before you begin

Look at the pre-requisites.
Click Next.
Configure RD Connection Broker for High Availability

Database connection string:
DRIVER=SQL Server Native Client 11.0;SERVER=ITWDC01;Trusted_Connection=Yes;APP=Remote Desktop Services Connection Broker;DATABASE=ITWRDCB
- Or any other database name you want, the database will be created by this wizard.
- Replace the DRIVER= part with the version you installed if it’s anything other than SQL Server 2012 (SP1)
Folder to store database files:
C:\Program Files\Microsoft SQL Server\MSSQL11.MSSQLSERVER\MSSQL\DATA
I used the instance default folder.
- Note that this points to a folder on the SQL Server.
DNS round robin name:
The DNS Zone name we configured in DNS earlier.
- And now you see why we had to create this zone in internal DNS as well. This needs to be locally resolvable.
Click Next.
Confirmation

If you get an error before this page:
- Check if TCP/IP is enabled in client protocols and for your instance
- Check if you can reach port 1433 on the SQL Server from the member server
Click Configure.
Progress

If you get an error on this page:
- Check SQL permissions for the security group
- Check if the database path you entered is correct
Click Close.

The RD Connection Broker is now in High Availability Mode and we are finally ready to complete the configuration.
Since the RD Connection Broker is known within the deployment for broker.it-worxx.nl and thus not a FQDN that’s associated with the internal domain (itw.test) we need to tell the gateway that external users are allowed to connect to it.
On the RD Gateway server, open Server Manager

Click Remote Desktop Services (yes, it says it’s missing servers, just ignore this), click Servers and then right click the RD Gateway server.
Click RD Gateway Manager.
RD Gateway Manager

Navigate to Policies – Resource Authorization Policies. There’s the default policy. Right click the default policy and disable it.
In the Actions pane to the right, click Manage Local Computer Groups.
Manage locally stored computer groups

Click Create group…

Name the new group.

On the Network Resources tab, add the RD Session Host(s) and the DNS external name of the broker.
Click OK.
RD Gateway Manager

Right click the Resource Authorization Policies node, click Create New Policy, Click Custom.

Name the policy, click User Groups

Add Domain Users, or any group you wish to grant access, click Network Resource

Click Select an existing RD Gateway-managed group or create a new one, and then browse to select the group you created a few steps back. Notice that upon selecting the group the RD Gateway-managed group members box shows the members of the group.
Review the Allowed Ports tab.
Click OK.
That’s it, configured all servers, configured certificates, configured RAP..
One thing left to do: Tell our RDS environment exactly what to publish.
Let’s publish full desktop sessions again, like in the single server setup. Next post we we’ll dig into publishing remote applications, I promise :)

In Server Manager, Remote Desktop Services, Session Collections, click Tasks and click Create Session Collection.
Before you begin

Review the requirements. This won’t be an issue in this setup, but you could restrict access to this collection by selecting a select group of people.
Click Next.
Name the collection

Enter a descriptive name. This name will be displayed under its icon in the Web Access interface.
Click Next.
Specify RD Session Host servers

Click the member server holding the RD Session Host role and click the Add button.
Click Next.
Specify user groups

You can limit access here. Add one or more groups to restrict access to these groups only. In this setup Domain Users will do fine.
Click Next.
Specify user profile disks

First, create a folder on the domain controller “UserProfileDisks” and a subfolder “RDS”. Share “UserProfileDisks”. Now in the Create Collection wizard enter \\itwdc01.itw.test\userprofiledisks\rds and set the Maximum size to 2GB. Further does and don’ts for User Profile Disks will be covered in a future post.
Click Next.
Confirm selections

Review the information and click Create.
View Progress

Wait until the collection is created and the server is added to the collection.
Click Close.
Time to test the setup!
On a machine that has access to your test setup (you may have to add the external FQDN for the RD Gateway and for the RD Web Access to your hosts file if you didn’t publish it to the internet) open https://webaccess.it-worxx.nl/rdweb

Hey! The RD Web Access application works. If you want to get rid of the /RDWeb part in the url, check out this post: https://msfreaks.wordpress.com/2013/12/07/redirect-to-the-remote-web-access-pages-rdweb
Enter a valid username and password (ITW\username or username@itw.test).
Create a user for this, or simply use the domain admin account.
Click Sign in.

After logging in you are presented with the full desktop session collection we created.
Also notice the popup in your taskbar as soon as you’re connected:

Again, sorry, but I’ll handle that in a future post.
Click the “Full Desktop” icon to open it and another popup appears:

This is just a warning that the resource you’re requesting wants to redirect your local devices.
But it also tells us that it is signed by “broker.it-worxx.nl”, and we’re using a gateway to connect to the remote resource..
And when you click Connect, you actually connect.

Because I connected as an admin I can see on which server I am logged on by clicking Local Server. And this screenshot also shows that it’s the broker that provided me the connection..
In the next part of this series I will show how to extend this setup with another RD Session Host, but this time we’ll publish some apps. Oh, and that post will probably be a lot shorter.
Arjan
Upate: Part 3 in the series was just published. Find it here: https://msfreaks.wordpress.com/2013/12/26/windows-2012-r2-remote-desktop-services-part-3/
30+ years experience in Microsoft powered environments. Enjoy automating stuff using powershell. In my free time (hah! as if there is any) I used to hunt achievements and gamerscore on anything Xbox Live enabled (Windows Mobile, Windows 8, Windows 10, Xbox 360 and Xbox One). Recently I picked up my Lego addiction again.

Do you know the maximum number of connections per broker?
Hi Mauricio,
Not in relation to system specs, but the absolute maximum number of sessions is around 4500.
Hi. Hope you can help.
First of all, great guide.. follow, and it looks like the most works.
But now i need some help.
I have set up the following server.
GW01 – Gateway, connection broker, Webaccess
TS02 – session host
TS01 – session host.
i have created a public IP, pointing to GW01.
and certifikate with the public DNS name also.
But when i am sitting internaly, i can connect to https://site/rdweb and then chose full desktop.
But i will like to connect by MSTSC externaly to the puclic DNS name.
but this dont work?
Should i point the pucblic to one of the session host server? ore what to do?
And.. should it just be port 3389 open to the puclic IP ore?
Hi Joergensen,
No only port 443.
If you want to connect using Remote Desktop Connection (instead of with Web Access) you need to setup the connection using your Gateway as well. For example, the computer you connect to is your Broker and then configure your Gateway settings to be your Gateway server. Make sure you are using the correct FQDN and post the exact error message you see when you try.
Hello Guys,
I am trying to setup my 3-party SSL cert on my 2012 R2 RDS farm.
I need to know do I create the CSR cer on my RDS Web Access Server?.
Thank you Edward Perrier
I’m wanting to do just that – set this up to use Remote Desktop, not going through web access.
The Web Access route works no problem but if i just try using mstsc to the FQDN, obviously it just goes to that specific server (in this case my gw, broker and web access server). I want to be able to mstsc to the load balanced collection.
Ive actually answered my own question. For those who are interested though, take a look at
https://social.technet.microsoft.com/Forums/office/en-US/eb46082a-600f-4c77-8fbe-2cf561f90b3c/relation-between-rd-connection-broker-and-rd-session-host-farm-in-2012-r2?forum=winserverTS
Read the third comment. Ive tried this and it worked perfectly!
Hi, I’ll try if someone can help me. I have tried setting up RDS services.
I’m getting error: “RemoteApp Disconnected”. “Your computer can’t connect to the remote computer because authentication to the firewall failed due to missing firewall credentials. To resolve the issue, go to the firewall website that your network administrator recommends, and then try the connection again, or contact your network administrator for assistance.
I have following setup:
External address: https://remote.domain.com/rdweb
Internal Lan:
1x RDS Server (gateway, session host, licensing, connection broker, Web)
1x ADFS (created relying party trust between ADFS and WAP)
1x PKI
1x DC
DMZ:
1x WAP Server https://remote.domain.com published. I’ve made relying party trust with ADFS server. I’ve added my ADFS and Remote Desktop server to it’s host file.
Certificate:
PKI *.domain.com
Network settings DMZ -> LAN
– HTTPS traffic allowed.
– Port forwarding 443 -> ADFS Web application proxy server (dmz).
Public DNS records (A)
– Remote.domain.com -> port forward 443 -> DMZ (WAP server)
Extra information: I’ve checked my firewall log. It seems that when I’m trying to open application, it tries to access my LAN with RDP protocol. Something wrong here…
I can log succefully in to my published remote desktop service, but it’s just that I can’t get app open.
Your help is greatly valued! thank you if you can help.
Great article, please advise if I want to use two RD connection broker servers in high availability, do I need to install SQL express on both the servers or I can install SQL express on a different(3rd) server (without any RDS roles)?
would be good if you showed how to create an rdp file for the broker so users could have a desktop icon and not have to log into a web portal.
Hi Bob,
Open the webacces site with Edge, Chrome, or Firefox. Clicking the icon will download the RDP file instead of opening it with ActiveX.
Is it possible to have the licensing installed on the individual Session Hosts?
We’ve seemed to observe that some of our Session Hosts revert back to the trial per user licenses even though you see the CALs installed within the License Manager within the Session Host. The Diagnoser no longer sees it.
Am I missing something?
It is, but why would you do that? One is basically enough, and point all session hosts to that licenserver.
If you need a license server per sessionhost than make sure the sessionhost uses that license server via policy or deployment properties.
Redundancy?
Hi Arjan, thank you for the step-by-step GUI installation of the RDS Services. However, the main reason I came across your page was trying to figure out how to create the .pfx certificates. You just click and choose the ones you’ve prepared. Well, how do you prepare one? What is the process? There is not a single article on the entire planet about it.
I guess, you know how to create certificate request in IIS & get cert from either local CA or third party CA.
Once you get the cert, you need to install /complete cert request in IIS. Once installed, simple export as .pfx format.
You mentioned that we need another certificate to publish this server to the internet.
I had done everything that you mentioned in Part 1, but still when I try to access remoteapp through external client computer, I am not able to get the login page. The RDWeb access works fine internally, but externally it just doesn’t work. what is the issue here?
Hi Mayank,
Please google how to publish a webserver to the internet and find what you did wrong. There’s no way for me (or anyone else) to know your setup and what is wrong with it.
In general: create external DNS record to point to your external IP.
On your router, allow 443 TCP from your public IP to the internal IP for the webaccess/gateway server.
Access your en ironment externally using the A record in DNS.
Awesome guide, one thing I got stuck on for a bit was SQL permissions – depending on the config of the SQL instance NT AUTHROITY\NETWORK SERVICE will need dbcreator permissions also.
Hi Arjan,
Just beginning a new life in IT and trying to learn. Your blog has been amazing!!!
I got an issue atm.
1. conf HA for connection broker. Im getting an error in the connection string. The last condition DATABASE=XX. Is this suppose to point to an actual database, I cannot find the folder. Also is this suppose to point to a folder shared with DC1? (I did the install as DC1 server and RDS1 Server with broker, session host, gateway and web access)
2. In DC1 SQL man. studio -> logins. I cannt search for RD connection/RDS connection broker to add.
Thank you!!
Hi Chad,
1. No, the db in the connection string will be created when you finish the wizard. The folder needs to exist on the sql server.
2. You need to create the group in ad first and add the computeraccount for the cb first
Hi there, 1st of all great guide!!, i tried the single server installation and everything work fantastic!
now im testing this multiple servers guide and im getting the following error message:
“Your computer can’t connect to the remote desktop gateway server address requested and certificate subject name does not match”
internally it works good but externally got this error
any ideas what this could be?, im usign individual ssl certificates
one for the connection broker, the web access and the gateway servers
any feedback will be appreciate it!
thanks
Daniel S.
Alot of great details here – thanks so much! I am just wondering about using certificates in my particular environment. Our RDS environment will be 100% internal, so RD Web Access or RD Gateway required. Do I still have to install certificates for the Session Hosts and Connection Brokers to function properly?
Sorry, forgot to add that we will be using Server 2016 for our RDS deployment!
HI,
I have deployed server 2012 r2 by following your instruction, I have a strange issue with the deployment, we have the site hosted in internal as .local and site pointed as .com, when we try to access the site, the site issues 403.4 error msg. I have reinstalled rdpweb and iis on the server and have a ssl wild card cert that I have used to deploy on the gateway and broker along with 2 host servers.
Can you please guide me what I am missing for the site to work.
Thanks
Nitin